Keywords: scene graph, scene object, game scene, game object, object render, fov object, rendering, illumination, screen, texture, player, glyph, update, effect, approach. Powered by TextRank.
22nd June 2020 at 9:47pm
This code is taken from the brogue source code and slightly modified.
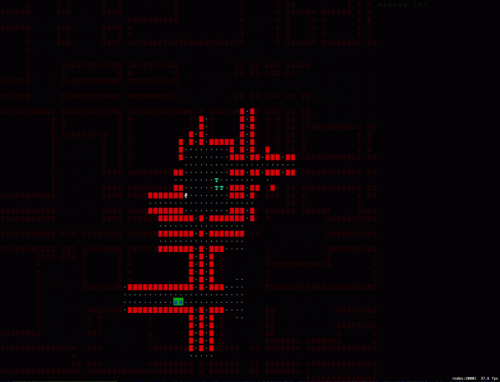
Rendering the map on screen is maybe the most important part of the game. I chose to develop this game on the iOS platform (possibily also on macOS) and use the libraries provided by Apple. The architecture should be portable to other platforms as most game development platforms are built around the same core concepts of scene graphs, and nodes with textures (sprites) that draw objects on the screen. Coordinate system maybe different (e.g the origin may be the top left of the screen or bottom left) but the basics are the same.
The idea is simple:
I take a layered approach to rendering the map by first rendering the level, then characters and FoV for the player.
The texture cache generates an image dynamically with the glyph that is requested and caches the result internally as it will be used over and over again. A detail here is that you need to calculate a scaling factor to make sure the glyphs are scaled correctly to fit any screen size and map size.
private func createTexture(glyph: String, size: CGSize) -> SKTexture {
    let fontSize = CGFloat(130)
    var scaleFactor: CGFloat {
        let font = UIFont(name: "Menlo", size: fontSize)!
        let attr = [NSAttributedString.Key.font: font]
        let opts = NSStringDrawingOptions.usesFontLeading
        let bounds = glyph.boundingRect(with: CGSize(width: 0, height: 0), options: opts, attributes: attr, context: nil)
        let factor = min(size.width / bounds.width, size.height / bounds.height)
        return factor
    }
    let font = UIFont(name: "Menlo", size: fontSize * scaleFactor)!
    UIGraphicsBeginImageContext(size)
    let fontAttr = [NSAttributedString.Key.font: font, NSAttributedString.Key.foregroundColor: SKColor.white]
    let realBounds: CGRect = glyph.boundingRect(with: CGSize(width: 0, height: 0),
                                        options: [.usesFontLeading],
                                        attributes: fontAttr,
                                        context: nil)
    let stringOrigin = CGPoint(x: (size.width - realBounds.width)/2 - realBounds.origin.x,
                               y: font.descender - realBounds.origin.y + (size.height - realBounds.height)/2)
    glyph.draw(at: stringOrigin, withAttributes: fontAttr)
    let surface = UIGraphicsGetImageFromCurrentImageContext()

    UIGraphicsEndImageContext()
    let texture = SKTexture(image: surface!)
    self.textureMap[glyph] = texture
    return texture

}
Scene graph
We need some nodes in the scene graph that will contain these textures. This is pretty straight forward and we generate row x col empty nodes for the backgroun, the same number for the foreground and add them as children to the root of the graph with the same location but different z-index values. The background node doesn't need a texture as we won't be printing a glyph on it but we'll just be adjusting its color. It's also a good idea to wrap these 2 nodes in a Cell object as we have an illumination attribute that will effect these nodes.
static let defaultIllumination: CGFloat = 0.3
let foreground: SKSpriteNode
let background: SKSpriteNode
var illumination: CGFloat
var glyph: SKTexture? {
    set(newGlyph) {
        foreground.texture  = newGlyph
    }
    get {
        return foreground.texture
    }
}
var fgcolor: SKColor {
    set(newColor) {
        let rgba = newColor.rgba
        foreground.color = SKColor(red: CGFloat(rgba.red * illumination),
                                   green: CGFloat(rgba.green * illumination),
                                   blue: CGFloat(rgba.blue * illumination),
                                   alpha: CGFloat(rgba.alpha))
    }
    get {
        return foreground.color
    }
}
var bgcolor: SKColor {
    set(newColor) {
        background.color = newColor
    }
    get {
        return background.color
    }
}
init(x: CGFloat, y: CGFloat, size:CGSize) {
    foreground = SKSpriteNode(color: .white, size: size)
    background = SKSpriteNode(color: .clear, size: size)
    foreground.colorBlendFactor = 1
    background.colorBlendFactor = 1
    foreground.position = CGPoint(x: x, y: y)
    background.position = CGPoint(x: x, y: y)
    foreground.zPosition = 1
    foreground.anchorPoint = CGPoint.zero
    background.anchorPoint = CGPoint.zero
    illumination = Self.defaultIllumination
}
Drawing a cell
Now in the game scene we add the nodes that the Cell object exposes to the scene graph
for x in 0..<cols {
    var row = [Cell]()
    for y in 0..<rows {
        let newCell = Cell(x: CGFloat(x) * cellWidth,
                           y: CGFloat(rows - y - 1) * cellHeight,
                           size: CGSize(width: cellWidth, height: cellHeight))
        row.append(newCell)
    }
    cells.append(row)
}

for x in 0..<cols {
    for y in 0..<rows {
        addChild(cells[x][y].background)
        addChild(cells[x][y].foreground)
    }
}
At this point we can refer to any node by cells[][].{foreground,background} to update its glyph, texture or illumination value. It's worth putting this update in its own function as it will be used in different places when rendering:
public func setCell(x: Int, y: Int, code: UInt32, bgColor: CGColor, fgColor: CGColor, illumination: CGFloat = 1.0) {
    cells[x][y].illumination = illumination
    cells[x][y].fgcolor = SKColor(cgColor: fgColor)
    cells[x][y].bgcolor = SKColor(cgColor: bgColor)

    if let glyph = UnicodeScalar(code) {
        cells[x][y].glyph = textureCache.getTexture(glyph: String(glyph))
    }
}
Further thoughts
This is an efficient way of rendering the level on the screen as there is minimal scene graph manipulation and we are just updating textures and colors. I have not looked in detail into how illumination and lighting could be implemented to be more realistic but this simple method of multiplicatively modifying RGB values seems to result in an OK result.
Update 2 - Graph based rendering
I mentioned that I took a layered approach to rendering which meant that there was a render method in GameScene that would take all the objects to be rendered as parameters and render them in order. The ordering is important because things overwrite each other. If you render the FoV before the player you will not see the player symbol '@' as it will be overwritten by a bright dot (the location of the player is always in the FoV). I decided that it would be a cleaner approach to have all the object render themselves and keep track of their dependencies that also need rendering. E.g the player now has a FoV object that it will ask to render itself before rendering itself (A lot of it selves there ...).
This is accomplished by having a Renderable protocol that takes the GameScene which contains the actually methods to manipulate textures on the screen. The Game object has a reference to the GameScene object to it can pass it along to the objects that are Renderable.
Update 3: Animation overlay
After starting work on the animations I realized that using the illumination system to render explosion effects with alpha channel was going to be a pain because of the transparency required. I would need to find the glyphs for the tiles that have the explosion effect and adjust illumination to give a transparency / lighting effect. Even with this approach I still wouldn't get exactly what I wanted as the effects that illumination provide even when applied to the background is not really what an explosion or laser charing effect look like. So I decided to add another NxM array of cells to the scene as the overlay. This is where all the animation rendering happens and it sits at a higher Z index than the tile cells. Now when the animation is rendered on this layer I can adjust the transparency of the background for the cell to get great effects.
1134 words
Powered by TF-IDF/Cosine similarity
First published on 2020-07-25
Generated on 11 Aug 2025 at 12:23 PM
Mobile optimized version. Desktop version.